この記事ではjQueryとCSSで画像にキャプションをつけるためのコードを解説します.HTML上に配置された画像にマウスオーバーした時に,画像のキャプションが表示されるアニメーションをつけていきます.CSSだけでも可能な処理ですが,jQueryを使用してアニメーションをつける方がコードもすっきりと収まります.CSSはその書き方の特性上,かなり読みにくくなってしまいます.「:hover」や「:active」でアニメーションをつけても問題はないですが,アニメーションはjQueryでつける方がいいでしょう.
今回は3つほど例を交えて解説していきます.サンプルページで動作を確認してみて下さい.画像にポインタを載せるとキャプションが表示されます.

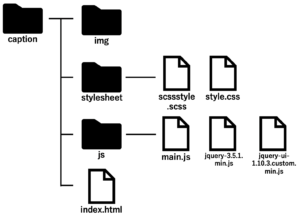
使用するファイル関係は以下の通りです.

HTML
<div id="container" role="main">
   <div id="image">
      <h2>Image Caption</h2>
      <div class="inner">
         <p><img src="./img/cafe.jpg" alt="">
            <strong>Cafe coffee</strong><span></span></p>
         <p><img src="./img/cafe.jpg" alt="">
            <strong>Cafe coffee</strong><span></span></p>
         <p><img src="./img/cafe.jpg" alt="">
            <strong>Cafe coffee</strong><span></span></p>
      </div>
   </div>
</div>
ヘッダー情報や,フッターなどは省略しています.<p>タグ内部の<span>タグは画像内部に影をつける要素です.
SCSS(CSS)
今回はSCSSでレイアウトを整えています.SCSSの方が要素を指定するのがとても楽です.SCSSはコンパイルしてCSSのコードに変換するのでそこまで難しくありません.ターミナルで以下のコマンドを実行するとCSSファイルに変換されます.
sass SCSSのファイル名.scss:変換先のファイル名.cssSCSSのコードも一部抜粋して添付します.
.inner {
    display: inline-block;
    p {
        width: 400px;
        height: auto;
        overflow: hidden;
        position: relative;
        text-align: center;
        margin-bottom: 50px;
        img {
            width: 100%;
            height: auto;
            vertical-align: bottom;
        }
        strong {
            position: absolute;
            display: block;
            z-index: 1;
            bottom: 0;
            width: 400px;
            height: 50px;
            background-color: rgba(0,0,0,0.5);
            color: #ffffff;
            text-align: left;
            padding: 10px;
            box-sizing: border-box;
        }
        span {
            position: absolute;
            display: block;
            z-index: 0;
            top: 0;
            width: 100%;
            height: 100%;
            box-shadow:0px 0px 20px 5px #000 inset;
            opacity: 0;
        }
    }
    p:nth-child(1) strong {
        opacity: 0;
    }
    p:nth-child(2) strong {
        opacity: 0;
        left: -200%;
    }
    p:nth-child(3) strong {
        opacity: 0;
        bottom: -80px;
    }
}
<p>タグには{position: relative}を設定し,<p>タグ内部の要素には{position: absolute}を開いていいます.<p>タグ内部の要素はすべて{opacity: 0}とし,すべて透明にして見えなくしています.3つの画像キャプションアニメーションは以下の通りです.
- 影とキャプションが浮き上がってくる
- 影が浮き上がってきて,キャプションが下から上がってくる
- 影が浮き上がってきて,キャプションが左から流れてくる
この3つのアニメーションをするために,それぞれの要素の初期場所を設定しています.
jQuery(main.js)
$(function(){

    var time  = 300;
    var $images = $('#image p');

    $images.filter(':nth-child(1)')
        .on('mouseover',function(){
            $(this).find('strong, span').stop(true).animate({
                opacity: 1
            },time);
        })
        .on('mouseout',function(){
            $(this).find('strong, span').stop(true).animate({
                opacity: 0
            },time);
        });

    $images.filter(':nth-child(2)')
        .on('mouseover',function(){
            $(this).find('strong').stop(true).animate({
                opacity: 1,
                left: 0
            },time);
            $(this).find('span').stop(true).animate({
                opacity: 1
            },time);
        })
        .on('mouseout',function(){
            $(this).find('strong').stop(true).animate({
                opacity: 0,
                left: '-200%'
            },time);
            $(this).find('span').stop(true).animate({
                opacity: 0
            },time);
        });

    $images.filter(':nth-child(3)')
        .on('mouseover',function(){
            $(this).find('strong').stop(true).animate({
                opacity: 1,
                bottom: 0
            },time*1.5);
            $(this).find('span').stop(true).animate({
                opacity: 1
            },time);
        })
        .on('mouseout',function(){
            $(this).find('strong').stop(true).animate({
                opacity: 0,
                bottom: '-50px'
            },time);
            $(this).find('span').stop(true).animate({
                opacity: 0
            },time*1.5);
        });
});
filter()メソッドで特定の要素を絞り込み,animate()メソッドで,引数に指定した,プロパティをtimeかけてアニメーションさせます.3つのアニメーションともやっていることはほとんど変わりません.すべてのファイル関連をダウンロードできます.試してみて下さい.
サンプルページはここから閲覧できます.


